
Form BeanUser Guide
Overview
FormBean is a means to render Fantom objects as HTML forms, validate submitted values, and reconstitute them back into Fantom objects. Built on top of IoC and BedSheet FormBean allows you to customise every aspect of your HTML form generation.
Features:
- Renders Fantom objects as HTML forms.
- HTML5 client and server side validation
- Customise HTML generation with skins
- Supports multipart forms / file uploads
- Uses BedSheet
ValueEncodersfor string conversion - Versatile means of generating select options
- Customised (error) messages
Current limitations:
- Maps, Lists and nested objects are not supported.
Quick Start
- Create a text file called
Example.fanusing afIoc using afBedSheet using afFormBean class ContactUsPage { @Inject HttpRequest httpRequest @Inject { type=ContactDetails# } FormBean formBean new make(|This|in) { in(this) } Text render() { Text.fromHtml( "<!DOCTYPE html> <html> <head> <title>FormBean Demo</title> <link rel='stylesheet' href='/styles.css' > </head> <body> <h2>Contact Us</h2> <span class='requiredNotification'>* Denotes Required Field</span> <form class='contactForm' action='/contact' method='POST'> ${ formBean.renderErrors() } ${ formBean.renderBean(null) } ${ formBean.renderSubmit() } </form> </body> </html>") } Text onContact() {// perform server side validation// if invalid, re-render the page and show the errorsif (!formBean.validateForm(httpRequest.body.form)) return render// create an instance of our form objectcontactDetails := (ContactDetails) formBean.createBean echo("Contact made!") echo(" - name: ${contactDetails.name}") echo(" - email: ${contactDetails.email}") echo(" - website: ${contactDetails.website}") echo(" - message: ${contactDetails.message}")// display a simple messagereturn Text.fromPlain("Thank you ${contactDetails.name}, we'll be in touch.") } } class ContactDetails { @HtmlInput { required=true; attributes="placeholder='Fred Bloggs'" } Str name @HtmlInput { type="email"; required=true; placeholder="fred.bloggs@example.com"; hint="Proper format 'name@something.com'" } Uri email @HtmlInput { type="url"; required=true; placeholder="http://www.example.com"; hint="Proper format 'http://someaddress.com'" } Str website @HtmlInput { type="textarea"; required=true; attributes="rows='6'"} Str message new make(|This|in) { in(this) } @Validate { field=#name } static Void validateName(FormField formField) { if (formField.formValue == "Trisha") formField.errMsg = "Ex-girlfriends not allowed!" } }// @SubModule only needed because this example is run as a script@SubModule { modules=[FormBeanModule#] } const class AppModule { @Contribute { serviceType=Routes# } Void contributeRoutes(Configuration conf) { conf.add(Route(`/`, ContactUsPage#render)) conf.add(Route(`/contact`, ContactUsPage#onContact, "POST"))// to save you typing in a stylesheet, we'll just redirect to one I made earlier// conf.add(Route(`/styles.css`, `styles.css`.toFile))conf.add(Route(`/styles.css`, Redirect.movedTemporarily(`http://pods.fantomfactory.org/pods/afFormBean/doc/quickStart.css`))) } } class Main { Int main() { BedSheetBuilder("Example_0").startWisp(8069) } } - Run
Example.fanas a Fantom script from the command prompt:C:\> fan Example.fan [info] [afBedSheet] Found pod 'Example_0' [info] [afBedSheet] Found mod 'Example_0::AppModule' [info] [afBedSheet] Starting Bed App 'Example_0' on port 8069 [info] [afIoc] Adding module definitions from pod 'Example_0' [info] [afIoc] Adding module Example_0::AppModule [info] [afIoc] Adding module afBedSheet::BedSheetModule [info] [afIoc] Adding module afFormBean::FormBeanModule [info] [afIoc] Adding module afIocConfig::IocConfigModule [info] [afIoc] Adding module afBedSheet::BedSheetEnvModule [info] [afIoc] Adding module afConcurrent::ConcurrentModule ___ __ _____ _ / _ | / /_____ _____ / ___/__ ___/ /_________ __ __ / _ | / // / -_|/ _ /===/ __// _ \/ _/ __/ _ / __|/ // / /_/ |_|/_//_/\__|/_//_/ /_/ \_,_/__/\__/____/_/ \_, / How do I set a laser pointer to stun? /___/ IoC Registry built in 142ms and started up in 139ms Bed App 'Example_0' listening on http://localhost:8069/ - Point your web browser to
http://localhost:8069/and you'll see a basic HTML contact form: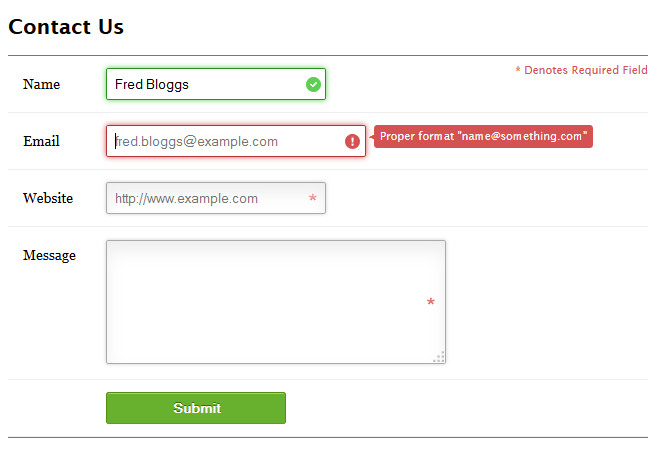
(Note the pretty styling was lifted from Bring Your Forms Up to Date With CSS3 and HTML5 Validation )
On submitting the HTML form, the form values are validated server side and reconstituted into an instance of ContactDetails. The bean is then echo'ed to standard out and a short reply message sent back to the browser.
Contact made!
 - name:    Fred Bloggs
 - email:   fred.bloggs@example.com
 - website: http://www.example.com
 - message: Hello Mum!
To and From HTML Forms
HTML forms are the backbone of data entry in any web application. It is common practice to model client side HTML forms as objects on the server, with fields on the object representing inputs on the form. We call such objects form beans. The FormBean class then does the necessary hard work of converting form beans to HTML and back again.
FormBeans should be autobuilt by IoC, passing in the type of object it should model.
formBean := (FormBean) scope.build(FormBean#, [MyFormModel#])
You could also use the @Autobuild facet on a field:
@Autobuild { ctorArgs=[MyFormModel#] }
private FormBean formBean
Or the best way, as in the quick start example, @Inject a FormBean instance as a field using the type facet attribute:
@Inject { type=MyFormModel# }
FormBean formBean
When created, a FormBean inspects the given type looking for fields annotated with @HtmlInput. For each field found it creates a FormField instance. FormFields hold all the information required to render the field as HTML, and convert it back again.
To render the HTML form, just call FormBean.renderBean(...). To pre-populate the HTML form with existing data, pass in a form bean instance and its field values will be rendered as the HTML <input> values.
Note that the <form> tag itself is not rendered, giving you more control over form submission and HTML generation.
The standard template to render a HTML input looks like:
<div class='formBean-row inputRow #NAME [ERROR]'>
    <label for="#NAME">#LABEL</label>
    <input type='submit' id='#NAME' name="#NAME" ... >
    <div class="formBean-hint">#HINT</div>
</div>
(Note that the hint div is only rendered if hint is non-null.) See Input Skins if you wish to render your own bespoke HTML.
When the HTML form is submitted to the server, use FormBean.createBean() to convert the submitted form values into a form bean instance.
Sometimes you don't always want to create a fresh form bean instance. For instance, your beans may be entities in a database and only some of the fields may be editable. In that case, upon form submission, retrieve a bean instance from the database and call FormBean.updateBean() to do just that.
ValueEncoders
Representing values as strings (to be rendered as HTML) is not always as obvious as calling toStr(). For instance, what about printing and formatting dates? On form submission, if a user leaves an input blank, should that be converted to null or an empty string?
Because there is no right answer for all occasions, FormBean leverages BedSheet's ValueEncoders service to convert different types to and from Str objects.
A ValueEncoder is initially selected based on the type of the form field. This may be overridden by specifying the ValueEncoder type on the @HtmlInput. (Instances are created and cached by IoC.)
@HtmlInput { valueEncoder=MyValueEncoder# }
public MyValue? myValue
Or you can set an instance directly on the FormField itself.
formBean.formFields[MyFormModel#field1].valueEncoder = MyValueEncoder()
Note, BedSheet provides a ValueEncoder for Bool to get around HTML's dodgy on / not submitted syntax.
Validation
HTML Form validation is boring and tedious at best.
Yes, there are hundreds of javascript form validation frameworks out there, but not one is appropriate for everyone in all situations. They're generally a pain to configure, awkward to tweak and don't go anywhere near the fact that validation has to be replicated on the server to double check actual values submitted.
Because life is too short, Alien-Factory takes a no-nonsense approach to HTML form validation and gladly hands it over to the browser. HTML5 form validation is the way of the future.
And if you can't wait for the future, use Hyperform.
The @HtmlInput facet attributes required, minLength, maxLength, min, max, pattern, and step map directly HTML5 input attributes and are rendered as such. As far as client side validation goes, this is all FormBean does. It is barebones but browser support for HTML5 validation is getting better every day.
You can, of course, embed and utilise any javascript form validation framework you wish! Using FormBean does not preclude you from using other validation frameworks.
Now, because hackers and testers alike constantly try to break your application, you can not assume that everyone is using a HTML5 enabled browser. That means any old junk may be submitted to the server and you have to guard against this.
Thankfully, FormBean performs some server side validation of its own. Calling FormBean.validateForm(...) will perform the same basic HTML5 validation as the browser. Any error messages generated are saved directly on the FormField instances.
Calling FormBean.renderErrors() will render the errors in a HTML list. The rendering template looks like:
<div class='formBean-errors'>
    <div class='formBean-banner'>#BANNER</div>
    <ul>
        <li> Error 1 </li>
        <li> Error 2 </li>
    </ul>
</div>
When rendering a form bean, any fields in error will have the error class set on the inputRow div.
While listing the errors together in one place may seem old skool (as oppose to displaying the error with the field in question) it does help with gaining a AAA accessibility rating.
To view the server side error messages (for styling) you may wish to switch off client side validation. Fortunately HTML5 gives us an easy way to do this, just add the novalidate attribute to the form, and submit it as usual.
<form action='/contact' method='POST' novalidate>
    ...
</form>
Custom Server-Side Validation
As well as the basic HTML5 validation, beans may also provide custom server-side validation. To use, annotate a bean method with @Validate. Validate methods should be static and take a single FormField parameter. They should inspect the formField.value and set an errMsg if invalid. Example:
class User {
    Str? name

    @Validate { field=#name }
    static Void validateName(FormField formField) {
        if (formField.formValue == "Trisha")
            formField.errMsg = "Ex-girlfriends not allowed!"
    }
}
If @Validate.field is null then the first parameter should be FormBean. This allows you to perform bean wide validation.
@Validate
static Void validateBean(FormBean formBean) { ... }
FormBean validation is performed after all and any FormField validation.
Note that validation methods are called using IoC, so services may be passed in as extra parameters:
@Validate { field=#name }
static Void validateName(FormField formField, MyService service) { ... }
Messages
Most FormBean configuration may also be done though messages. These are basic key / value pairs that are assmebled on a per bean basis. The mechanism is extremely versatile.
Message Locations
Labels, placeholders, hints and validation messages are all customisable through messages. Messages boil down to a simple key / value map of strings on FormBean.
Each FormBean instance creates its own map of messages by merging together property files. These files are looked for in the following locations:
FormBean.propsin podafFormBeanFormBean.propsin pod<pod><bean>.propsin pod<pod>
With messages in each file overriding those defined previously.
For example, if your form bean is of type acme::UserBean then the following files are looked up:
FormBean.propsin podafFormBeanFormBean.propsin podacmeUserBean.propsin podacme
Property files may lie anywhere in your pod, but they must be declared as a resource directory in the build.fan. This ensures they are included in the pod file. Example:
resDirs = [`fan/entities/UserBean.props`]
or
resDirs = [`fan/entities/`]
Note that file names are case-insensitive and have the extension .props or .properties.
There are generally 2 strategies for handling bean messages; per bean or per app. (Or you could mix the two!)
Messages per Bean
Because FormBean looks for a property file named after the form bean, you can collect all the properties for the bean there. This is a good strategy if you only have a few beans but with lots of properties.
Example, if your form bean is called LoginDetails then you would create a pod file called LoginDetails.props. In there, you list all the messages specific to that bean. LoginDetails.props may look like:
username.label  = Username:
password.label  = Password:
Messages per App
Messages may optionally be prefixed with the bean name. This lets you group all your messages for all your beans in the one property file - FormBean.props.
Example, if you had a form bean LoginDetails and another SignupDetails your FormBean.props may look like:
loginDetails.username.label  = Username:
loginDetails.password.label  = Password:

signupDetails.username.label  = Username:
signupDetails.password.label  = Password:
The advantage of this strategy is that it succinctly groups all the messages for all your beans together in the one place; handy if you have lots of beans with only a few messages each.
Manual Messages
You may also manually set messages on a FormBean instance:
formBean.messages["username.label"] = "Username:"
The Messages service itself also takes contributions of string Maps, should you dislike the idea of .props files.
@Contribute { serviceType=Messages# }
Void contributeMessages(Configuration config) {
    config.add([
        "loginDetails.username.label"  : "Username:",
        "loginDetails.password.label"  : "Password:"
    ])
}
In all, FormBean Messages are very versatile.
Message Types
Field Messages
All the attributes on the @HtmlInput facet may also be defined by messages. They take the form
<bean>.<field>.<attribute>
where <bean> is the (optional) name of the bean class, <field> is the field name, and <attribute> is the name of the @HtmlInput attribute.
userBean.username.label       = Username:
userBean.username.placeholder = Enter username here
userBean.username.hint        = Must be at least 5 characters
Note that any values on the @HtmlInput facet override those defined in messages.
Validation Messages
Validation messages are looked up with the key:
<bean>.<field>.<validation>.msg
where <validation> is the validation type / attribute name. Example:
userBean.age.min     = 7
userBean.age.min.msg = Sorry, but you're not old enough for this ride!
All occurrences of the literal strings ${label}, ${constraint}, and ${value} are replaced with appropriate values.
userBean.age.min     = 7
userBean.age.min.msg = Sorry kid, you need to be at least ${constraint} for this ride!
Both <bean> and <field> may be ommitted to provide a default value for all validation messages of that type:
min.msg = ${constraint} is too small
TIP: This can be used to set a default max length for all text boxes:
maxLength = 512
Defaults
The default messages supplied by FormBean are:
errors.msg    = There were problems with the form data:

required.msg  = ${label} is required
minLength.msg = ${label} should be at least ${constraint} characters
maxLength.msg = ${label} should be at most ${constraint} characters
notNum.msg    = ${label} should be a whole number
min.msg       = ${label} should be at least ${constraint}
max.msg       = ${label} should be at most ${constraint}
pattern.msg   = ${label} does not match the pattern ${constraint}

submit.label  = Submit
Skins
Input Skins
Because the default HTML template is not suitable for every purpose, you can substitute your own skins for rendering HTML. Just implement InputSkin.
Skins may be set on the FormField directly for a specific field:
formBean.formFields[MyFormModel#field1].inputSkin = MySkin()
Or they may be contributed to the InputSkins service where they are used by default for that specific @HtmlInput.type:
@Contribute { serviceType=InputSkins# }
Void contributeInputSkins(Configuration config) {
    config["custom"] = MySkin()
}

// then on your form bean field:
@HtmlInput { type="custom" }
Str myValue
Skins make it easy to render custom markup for date pickers.
TIP: Use Duvet in your skins to inject field specific javascript.
For dates, I personally like to use Bootstrap Datepicker - see the DatePicker for FormBean article for details.
Error Skins
Implement ErrorSkin to define how error messages are displayed. It lists the errors messages displayed at the top of the form. Because you'll want most form beans in an app to look the same, you can add your ErrorSkin as an IoC service:
Void defineServices(RegistryBuilder bob) {
    bob.add(ErrorSkin#, MyErrorSkin#)
}
Or you can set it directly on the FormBean instance:
formBean.errorSkin = MyErrorSkin()
Select Boxes
HTML <select> elements are notoriously difficult to render. Not only do you have the hassle of rendering and value encoding the field itself, but you have to do it all over again for all the <option> tags too! And these options aren't just hardcoded, they're often user specific and / or returned from a database query.
FormBean's default skin for select uses OptionsProviders to provide the options to be rendered. Like InputSkins an OptionsProvider may be set on the FormField directly for a specific field:
formBean.formFields[MyFormModel#field1].optionsProvider = MyOptions()
Or they may be contributed to the OptionsProviders service where they are used by default for that specific field type:
@Contribute { serviceType=OptionsProviders# }
Void contributeOptionsProviders(Configuration config) {
    config[MyValue#] = MyOptions()
}

// then on your form bean field:
@HtmlInput
MyValue myValue
The method OptionsProvider.options() returns a map of option values. The values are converted to strings via the usual ValueEncoder service in the same way as the select value.
The keys of the map are used as message keys in the format:
option.<key>.label
If not found then the key itself is used as the option label.
Note that a default OptionsProvider is already given for Enums. So to render a Enum field as a select element with custom display labels:
enum class Colours {
    red, blue
}

// then on your form bean field:
@HtmlInput { type="select" }
Colours colour

// then in your bean.props:
option.red.label  = Roses are red
option.blue.label = Violets are blue
Radio Buttons
Radio buttons re-use the OptionsProvider mechanism from Select Boxes to render individual values and lables. See the above section for more details.
To render a form value as a set of radio buttons, set the form field type to radio.
File Uploads
FormBean can also handle File uploads!
To use, set your form field type to either a Buf or a File:
class FormDetails {
    @HtmlInput Buf  uploadedBuf
    @HtmlInput File uploadedFile

    new make(|This|f) { f(this) }
}
Render your HTML as normal, just make sure the form element has the correct enctype (MUST be multipart/form-data) and method attributes (MUST be POST):
html := "<form action='...' enctype='multipart/form-data' method='POST'>"
html += formBean.renderErrors()
html += formBean.renderBean(null)
html += formBean.renderSubmit()
html += "<form>"
When the form is submitted, use FormBean.validateHttpRequest() and create your form object as normal:
valid := formBean.validateHttpRequest()
if (!valid)
    return render

details := (FormDetails) formBean.createBean
Bufs and Files should now be populated on your form. Easy!
echo(details.uploadedFile)// --> myFile.tmp
By default, FormBean creates in-memory files for uploaded files. This negates the need to use File.deleteOnExit() (which is evil) and in general, negates all need to delete temp files after use.
To save an uploaded file to a particular file system location, then simply use File.copyTo().
If validation is required, like enforcing a max file size before it is loaded into memory, then you may provide your own FormBean.fileUploadHook.
Messages Cheat Sheet
Example messages, explaining where they would be used.
# Message Properties Cheat Sheet
# ******************************
#
# Place global properties in 'FormBean.props'.
# Place bean specific properties in '#BEAN.props', e.g. 'UserBean.props'
# Ensure all property files are bundled in your pod via 'resDirs' in 'build.fan'


# Field Attributes
# ================

# specific to the field 'UserBean#creditCard'
userBean.creditCard.label              = Credit Card Type
userBean.creditCard.minLength          = 16
userBean.creditCard.maxLength          = 16

# used for any field named creditCard
creditCard.label                       = Credit Card Type
creditCard.minLength                   = 16
creditCard.maxLength                   = 16


# Validation Messages
# ===================

# specific to the field 'UserBean#creditCard'
userBean.creditCard.minLength.msg      = Too few numbers!

# used for any field named 'creditCard'
creditCard.minLength.msg               = Too few numbers!

# used for *all* 'minLength' validation messages
minLength.msg                          = Too few numbers!

# also...
# used for all fields in 'UserBean'
userBean.minLength.msg                 = Too few numbers!


# Errors Message
# ==============

# specific to the 'UserBean' class
userBean.errors.msg                    = Please fix the errors

# used in all error banners
errors.msg                             = Please fix the errors


# Select Option Messages
# ======================

# specific to the field 'UserBean#creditCard'
userBean.creditCard.option.visa.label  = Visa

# used for any field named 'creditCard'
creditCard.option.visa.label           = Visa

# used for any option with the key 'visa'
option.visa.label                      = Visa

# also...
# used for all options in 'UserBean'
userBean.option.visa.label             = Visa
Wot No BedSheet!?
The original version of FormBean was designed to work with BedSheet; but since v1.2.0, FormBean has no hard dependencies on BedSheet or web! It turns out, that aside from some ValueEncoder string conversions, FormBean doesn't actually do much web stuff - it just renders a bit of HTML and checks form values!
If used in a BedSheet application then FormBean will automatically make use of BedSheet's ValueEncoders service. Note that FormBean.validateHttpRequest() will only work during a BedSheet HTTP request, or a web HTTP request.
This means that FormBean may be used by non-web classes libraries; such as domain models wanting to utilise validation methods.
Note that due to the special BoolEncoder required for Checkbox submissions, FormBean should only be used with BedSheet v1.5.8 or later.